Mega Man!
(Rock Man)
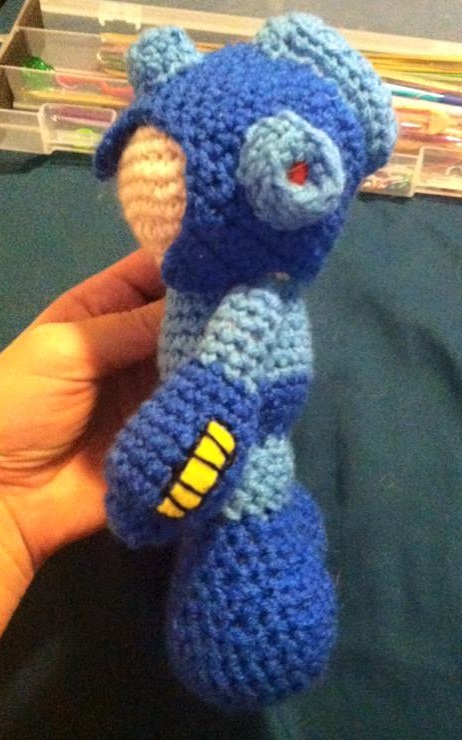
This pattern is based fairly heavily off of the wonderfully talented Jennifer Vasseur ‘s adorable Sailor Moon amigurumi doll pattern (Found here: http://ami.jenvasseur.com/2011/07/sailor-moon-amigurumi-pattern/) I can not take any credit for the construction of the doll, or the body/ head patterns. The only alterations I’ve made are to the hair (helmet), arms and legs. Nothing else is mine, and all the credit for the rest of the doll’s pattern and construction belongs to Jennifer.
Materials:
H Hook (5.00mm)
Red Heart Super Saver: blue
Impeccable: Clear Blue
Red Heart: Buff
1 sheet red felt
optional:
Yellow felt
black embroidery floss
1 set doll eyes
(I despise red heart, but the blue was perfect. If you can find a worsted weight primary blue that isn’t red heart, PLEASE use that instead.)
Stitch Key:
Rnd: Round
ST: Stitch
MR: Magic Ring
SC: Single Crochet
2 SC in 1: Single crochet, then single crochet again in the same stitch
Invdec: Invisible Decrease
(Push the hook through only the front loop of the stitch, without yarning over, push the hook through the front loop of the next stitch, yarn over once, and pull through all but one loop on the hook, then yarn over and pull through.)
Note:
–As with the original pattern, this pattern is written to be worked in the round. Do not join, and work in continuous rounds. Mark the first stitch of each round to keep track of your stitch count.
-The original pattern’s order is maintained because it is written in the best order to create each item then sew the pieces together. The legs and body must be made first.
Legs (Make 2)
Leg
with A
Chain 9
join in the round
2-5 (Sc in next st, 2 sc in next st) around
Sew felt circle over the hole in the center of the foot (Mega Man – Red. Protoman- green.)
6 , 8, 10, 13, 14 – (SC 2, invdec) around
7, 9, 11, 12, – sc around
-at this point you should have 9 sts.-
switch to B
SC around 4 rows
Body:
Rnd1: Place the inside of the legs together (I prefer to put the sides where the colors don’t line up together) and with the two sts closest to each other, put your hook through both loops, yarn over with Blue and pull through both loops and SC. This St will not be worked with the rest of the rounds. Now SC around one leg, and continue on to the next leg.
Rnd2: (2SC in 1 st, sc7) around
Rnd3: (SC2, 2SC in 1) around
-begin stuffing. Make sure the legs are stuffed firmly and continue stuffing as you go.-
Rnd4: SC around
Rnd5: Switch to Clear Blue, SC around
Rnd6: SC around.
Rnd7: (InvDec, SC6) around
Rnd8: Sc around
Rnd9: (SC5, InvDec) around
Rnd10:(InvDec, SC) around Switch to buff in the last stitch.
Rnd11:(2sc in 1, SC) around
Rnd12: (SC 2, 2sc in 1) around
Rnd13:(SC2 in 1, SC 3) around
Rnd14: (SC4, 2 SC in 1) around
Rnd 15-18: SC around
Rnd 19: (Invdec, SC 4) around
Rnd20: (Sc 3, Invdec) around
Rnd21: (Invdec, SC2) around
-attach eyes between rows 17 and 18-
Rnd22:( SC, Invdec) around
Rnd23:Invdec around.
Sew opening closed, and fasten off.
Helmet:
Rnd1:With Blue, MR6
Rnd2: 2 sc in each st around
Rnd3: (SC, 2 sc in 1) around
Rnd4: (Sc2, 2 sc in 1) around
Rnd5: (2 sc in 1, SC3) around
Rnd6: (SC 4, 2 SC in 1) around
Rnd7-13: SC around.
Mark off 7 sts. SC across between markers 4 rows, decrease at the beginning of each row to make the point at the front of the helmet.
Mark the 4th stitch on either side of the point of the helmet.
SC across between the markers 2 rows
Mark off 6 St on either side
SC across, Decreasing at the beginning of each row to make the bottom points of the helmet.
With Clear Blue, Chain4
SC across 2 rows to make a square.
SC 2 rows around the edge of the square.
Stuff lightly, and sew just above the middle point of the helmet.
With Clear Blue, Chain 4
SC across 10 rows.
SC 2 rows around the edge of the rectangle as before.
Sew just above the square on the top of the helmet, stuffing lightly before finishing.
Ears: make 2
MR 6 (DO NOT pull the hole closed completely. As with the feet, you want to leave a gap)
Rnd1: SC 1 row
Rnd2:(SC 2in1, SC) in only the back loops of the st.
Rnd3: SC around
Rnd4: (SC 2 in 1, SC) around.
-Cut a small red circle, and sew it over the opening you left in your magic ring. Invert the “ear” half way, Stuff lightly, and sew on either side of the helmet.
Right Arm:
If you don’t want a buster on your Mega Man, make 2
Rnd1: MR9
Rnd2: SC around
Rnd3: (2SC in 1, SC) around
Rnd4: (SC, Invdec) around
Rnd5-7: SC around
Rnd8: (SC, Invdec) around
Switch to Clear Blue
Rnd9-15: SC around
Stuff and sew to right side of the body just under neck
Buster Arm:
Rnd 1: MR 9 (DO NOT pull all the way closed! Only pull tight enough that the stitches are near each other.)
Rnd2: SC around
-Cut a red felt circle, and sew to the inside loops of the current row of stitches. MAKE SURE you don’t accidentally sew on the outside loops, since you will need those to continue crocheting.)
Rnd3: 2sc in 1 around
Rnd4-7: SC around
Rnd 8: (SC, Invdec) around
Rnd9: SC around
Rnd10: (SC, Invdec) around
Rnd11-15: Switch to Clear Blue, SC around
Stuff firmly, and sew to the left side of the body at the neck.
Optional, Cut a small rectangle of yellow felt, and sew to the outer side of the buster. Embroider around the edge with black embroidery floss, and add horizontal embroidery lines across the rectangle for extra detail.
Create the face however you see fit.
*This pattern is untested! If you find an error, please let me know. *
*
Do not sell this pattern, or anything made from this pattern. Deadpool is property of Marvel.
Materials: Carron Simply Soft Autumn Red (1)
Size 8 DPN (5)
Black felt (1)
Minimal amount white embroidery floss/ white buttons
Guage: Not important
Head:
CO 12 sts
Row 1: KFB2, K1 across
Row 2: Knit
Row 3: (KFB, K1) across
Row 4: Knit
Row 5: (K1, KFB) across
Row 6: Knit
Row 7: (K1, KFB) across
Row 8: Knit
Row 9: (K1, KFB, K2) Across
10-26 Knit
Row 27: (K6, K2tog, K5) across
Row 28-30: Knit
Row 31: (K5, K2tog, k5) across
Row 32-34: Knit
Row 35: (K5, K2tog, K4) across
Row 36-38: Knit
Row 39: (K2, K2tog, K1) Across
Row 40-41: Knit
Row 42: (K2tog, K2)
Row 43-44: Knit
Row 45: (K1, K2tog,) across
Row 46: Knit
Row 47: K2tog across
Break yarn, Stuff, thread thru remaining stitches, pull tight to seal off.
Body:
CO 12 sts
Row 1: KFB2, K1 across
Row 2: Knit
Row 3: (KFB, K1) across
Row 4: Knit
Row 5: (K1, KFB) across
Row 6: Knit
Row 7: (K1, KFB) across
Row 8-26: Knit
Row 27: K6, K2tog, k5) across
Row 28-30: Knit
Row 31: (K5, K2tog, K5) across
Row 32-34: Knit
Row 35: (K5, K2tog, K4) Across
Row 36-38: Knit
Row 39: (K2, K2tog, K1) across
Row 40-41: Knit
Row 42: (K2tog, K2) across
Row 43-44: Knit
Row 45: (K1, K2tog) across
Row 46: Knit
Row 47: (K2tog)
Break yarn, Stuff, thread thru remainging stitches, pull tight.
Legs (Make 2)
CO 8 sts.
Row 1: KFB across
Row 2: K
Row 3: Kfb, K1
Row 4-6: Knit
Row 7: (K1, K2tog) Across
Row 8-26 Knit
Row 27: K2tog across
Break yarn,Stuff, thread needle thru remaining stitches, pull tight.
Arms (Make 2)
CO: 15 sts
Row 1-10: Knit
Row 11: K1, Kfb
Row 12: Knit
Row 13: K1, Kfb
Row 14: knit
Row 15: Kfb3, K1
**This turned out correct for me with the yarn and needles I used. If you find the arms are too short for your doll, repeat row 12 until the length is to your liking**
break yarn, Stuff, thread needle thru remaining stitches, pull tight.
Use photo as guide to stitch pieces together. Cut black details from felt and sew on with transparent or black thread. Embroider eyes with white embroidery floss, or sew on white buttons.
